


Is Your Water Heater Element Failing? Signs and Diagnosis
When your electric water heater fails, a bad heating element is a common culprit. It's often a simple DIY fix that saves you buying a new unit.
Quick Answer: Common signs your water heater element needs replacement:
- No hot water or only lukewarm water
- Hot water runs out quickly
- Popping or hissing sounds from the tank, often due to sediment buildup
- The circuit breaker trips repeatedly
- Slow water heating or long recovery times
Electric heaters have one or two elements. If one fails, performance drops. Elements can last a decade, but hard water shortens their lifespan. Let's diagnose the problem before you consider a full replacement.

Identifying the Correct Replacement Element
Before starting, you must get the right replacement element, as they vary in style, wattage, and voltage.
- Style: Most modern heaters use screw-in elements. Older models might have a bolt-in (or flange-type) element, which is secured with four bolts. Universal adapter kits are available to convert from bolt-in to screw-in.
- Wattage and Voltage: This is critical. Check the data plate on the side of your water heater for the correct specifications. Common wattages are 3,500, 4,500, or 5,500 watts, and voltages are typically 120V or 240V. Always match the voltage. Using a lower wattage element is safe but will heat water more slowly; never use a higher wattage than specified.
- Density: This refers to how concentrated the heat is on the element's surface.
| High Watt Density (HWD) | Most common. Least expensive. Prone to corrosion and limescale buildup, which can reduce its efficiency. || Low Watt Density (LWD) | Better for hard water areas. Larger surface area, which helps reduce mineral buildup and hot spots. May have a fold-back design. || Lime Life (Ultra Low Watt Density) | Premium elements. Made with corrosion-resistant materials like nickel/stainless steel. Designed to resist limescale deposits and dry firing. |
To identify the right element, we recommend the following steps:
- Check the Data Plate: Your primary source for voltage and wattage.
- Inspect the Old Element: If the plate is unreadable, remove the old element to check for markings.
- Note the Style: Determine if it's screw-in or bolt-in.
- Consider Water Quality: For hard water, upgrade to an LWD or lime life element for a longer lifespan.
How to Test a Water Heater Element
To confirm a faulty element before starting a water heater element replacement, use a multimeter to test for continuity and shorts.

Here's how to test an element safely:
- Turn Off Power: Shut off the circuit breaker for the water heater at your main electrical panel.
- Verify Power is Off: Use a non-contact voltage tester on the wires at the element to ensure there is no live current.
- Access the Element: Remove the access panel, insulation, and plastic safety cover over the element terminals.
- Disconnect Wires: Use pliers to disconnect the two wires from the element's screw terminals.
- Set Multimeter: Turn your multimeter to the ohms (Ω) setting for resistance.
- Test for Continuity: Touch one probe to each screw terminal. A good element shows resistance (e.g., 12-13 ohms for a 4,500W element). A reading of infinity (OL) or zero means the element is bad and needs replacement.
- Test for a Ground Short: Touch one probe to a terminal and the other to the tank. The reading must be infinity (OL). Any other reading means it's shorted and must be replaced.
Once you've identified a faulty element, you're ready for the replacement.
Your Step-by-Step Guide to Water Heater Element Replacement
Ready to replace the element yourself? This guide walks you through the process safely. It's a manageable DIY project that restores your hot water and saves money.
Tools and Prep for Water Heater Element Replacement
Gathering the right tools and following safety precautions is crucial for a smooth replacement.

Tools and Materials Checklist:
- Element Wrench or 1 1/2" Deep Well Socket
- Screwdrivers (Phillips and flathead)
- Needle-nose Pliers
- Multimeter and Non-Contact Voltage Tester
- Garden Hose
- Bucket and Rags
- New Heating Element with Gasket (matching your heater's specs)
- Plumber's Tape or Pipe Joint Compound (optional)
Safety Precautions: Don't Skip These Steps!Working with electricity and hot water is dangerous. Follow these steps.
- Turn Off Power: Go to your circuit breaker and switch off the power to the water heater.
- Verify Power is Off: Use a non-contact voltage tester on the element's wires to confirm there is no electricity. Do not proceed if there is power.
- Shut Off Water: Turn the cold water inlet valve on top of the heater clockwise until it stops.
- Relieve Pressure: Open a hot water faucet somewhere in your house. This will help the tank drain and release pressure.
The Water Heater Element Replacement Process: Removing and Installing
With power and water off, you can replace the element.

- Drain the Tank: Connect a garden hose to the drain valve and run it to a floor drain or outside. Open the valve to drain the tank, which can take 20-30 minutes. Clear any sediment clogs carefully.
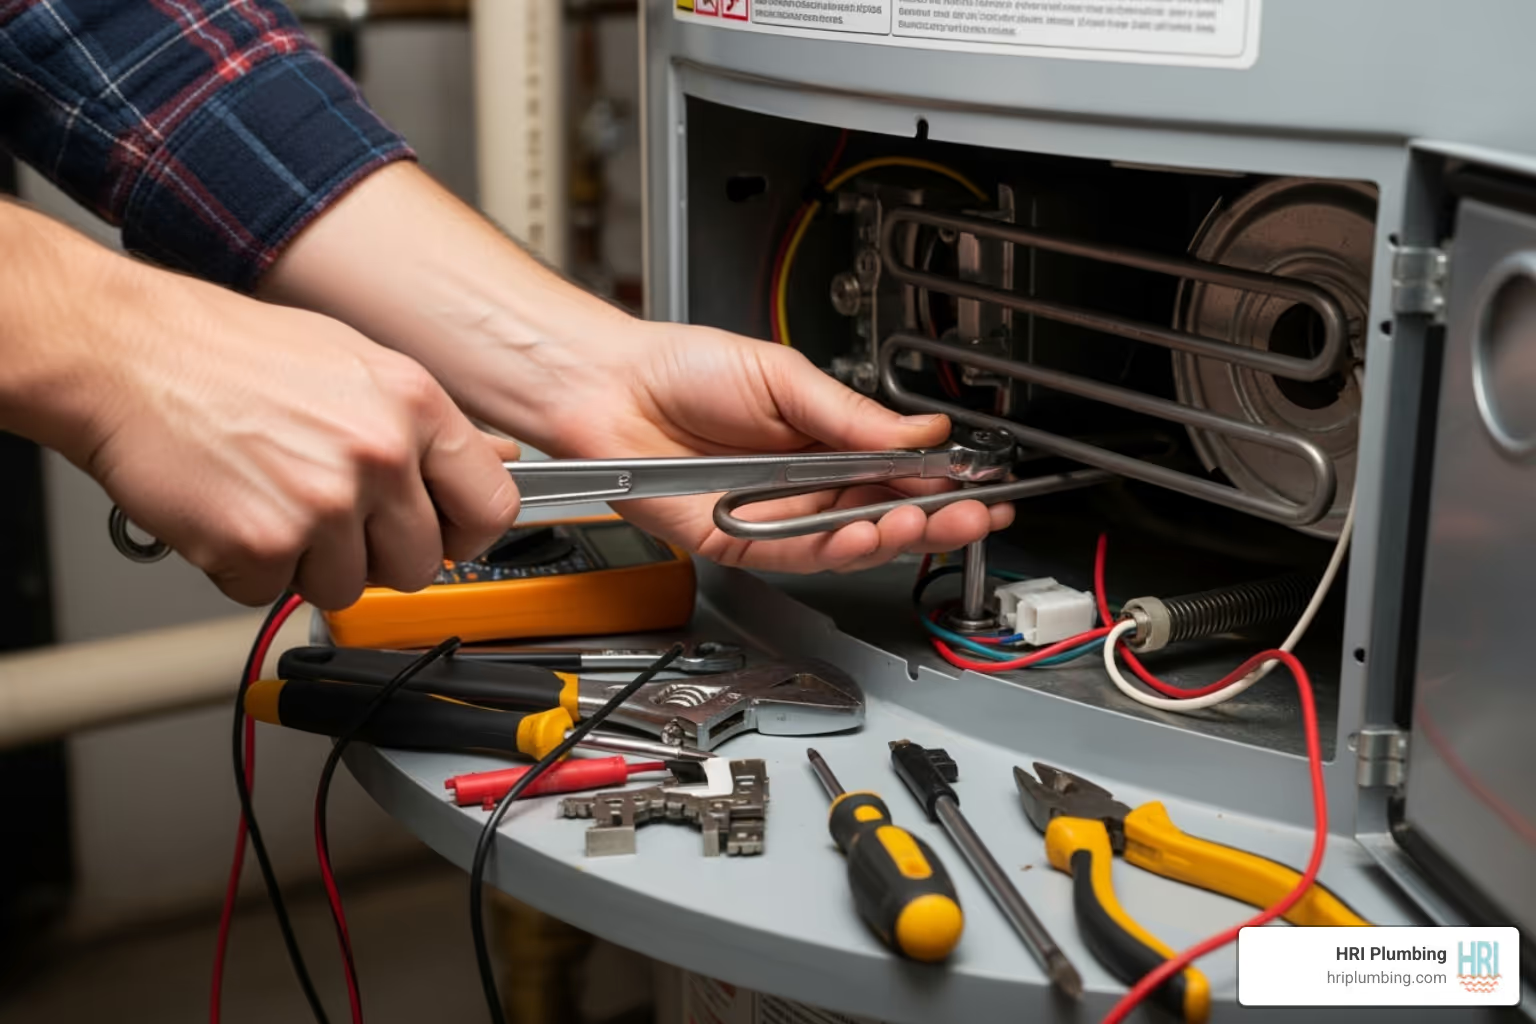
- Remove the Old Element:
- With the tank empty, remove the access panel, insulation, and safety cover.
- Disconnect the wires from the element. Use an element wrench to unscrew the old element (counter-clockwise) and pull it out with its gasket.
- Install the New Element:
- Clean the tank threads. Place the new gasket on the new element (a drop of dish soap helps the seal). Apply plumber's tape to the threads for leak protection.
- Screw the new element in by hand, then tighten snugly with the wrench—do not overtighten. Reconnect the electrical wires.
Refilling the Tank and Final Checks
Proper refilling is critical to avoid damaging the new element.
- Close the Drain Valve: Make sure the drain valve at the bottom of the tank is tightly closed.
- Refill the Tank: Open the cold water supply valve. Let the tank fill completely. You'll hear the water stop flowing when it's full.
- Purge Air from the System: Keep a hot water faucet open. Let it run until water flows steadily for three minutes to purge all air from the tank. Crucial: Skipping this step will cause "dry firing" and instantly burn out the new element.
- Check for Leaks: Check the new element for leaks. If you see any, turn off the water, drain the tank, and re-check the gasket and tightness.
- Reassemble: Once you've confirmed there are no leaks, close the hot water faucet. Replace the safety cover, insulation, and access panel.
- Restore Power: Go to your electrical panel and turn the circuit breaker for the water heater back on.
- Wait for Hot Water: It can take up to two hours to heat fully.
After the Fix: Troubleshooting and When to Call a Pro
Congrats on the replacement! While often straightforward, issues can arise. Here’s how to troubleshoot and know when to call a pro.
Common Issues and Pro Maintenance Tips
Even with careful work, you might face these problems post-replacement.
- Stuck Element: If the old element is stuck from mineral buildup, apply penetrating oil and wait. If it still won't turn, don't force it—call a pro to avoid damaging the tank.
- Leaks After Installation: A leak around the new element usually means a bad gasket seal. You'll need to drain the tank, remove the element, and reinstall it, possibly with a new gasket.
- No Hot Water: No hot water? Check that the breaker is on and wires are secure. The issue could be a dry-fired element (from air in the tank) or a faulty thermostat.
Proactive Maintenance to Extend Element Life:
- Flush the Tank Annually: Flush the tank annually to remove sediment that damages the lower element.
- Check the Anode Rod: Inspect the anode rod every few years. This "sacrificial" rod corrodes to protect your tank and elements.
- Set a Safe Temperature: Keep the thermostat around 120°F to reduce stress on the elements and prevent scalding.
- Consider Upgrading: In areas with hard water, using a low-watt density or lime life element can significantly extend its lifespan.
When a DIY Fix Isn't Enough
While a great DIY project, some situations require a pro. Safety is the top priority.
Call a professional if you encounter:
- Persistent Electrical Problems: If the circuit breaker continues to trip after you've checked your work, it could signal a more complex wiring issue.
- Damaged Tank Threads: Stripped or corroded tank threads prevent a watertight seal. This requires a professional and may mean the tank needs replacing.
- Multiple Failing Parts: If the thermostat is also failing or the tank is leaking elsewhere, it's a larger problem. A pro can advise if replacing the unit is more cost-effective.
- Difficult Access: If your water heater is in a tight or hard-to-reach space, it's safer to let an expert handle the job.
At HRI Plumbing, we're here to help when a DIY project is too much. We provide 24/7 support across Springfield IL, Sherman IL, Rochester IL, Chatham IL, Rushville IL, and Jacksonville IL, offering flexible options for any budget.
When you need expert help, contact us for water heater repair in Springfield, IL. We'll get your hot water flowing again safely.


