




Still Hearing That Phantom Flush After a Flapper Swap?
Are you wondering why replacing your toilet flapper might not stop that phantom flush? You went to the hardware store, found the exact replacement part, drained the tank, and snapped the new rubber piece into place. You felt a sense of accomplishment—until twenty minutes later, when that familiar, frustrating hiss of water refilling the tank started up all over again. A toilet that runs constantly or flushes itself intermittently is one of the most annoying plumbing issues a homeowner can face.
This phenomenon is known as a "phantom flush." It happens when water slowly and silently drains from the tank into the bowl, causing the fill valve to trigger automatically to replace the lost water. Most homeowners assume the flapper is the sole sealing mechanism, but it is actually only half of the equation. If the surface beneath the flapper is compromised, even a brand-new, factory-perfect rubber seal will fail to hold the water back.
Ignoring this issue is not an option. As August late summer water bills compounding with phantom flush waste begin to arrive, the true cost of a running toilet becomes painfully clear. A single compromised toilet can waste thousands of gallons of water over a few weeks, putting unnecessary strain on your household budget and local water resources.
When basic troubleshooting doesn't stop the leak, relying on professional plumbing services ensures your system is repaired correctly and your water usage returns to normal.
Understanding the Anatomy of a Phantom Flush
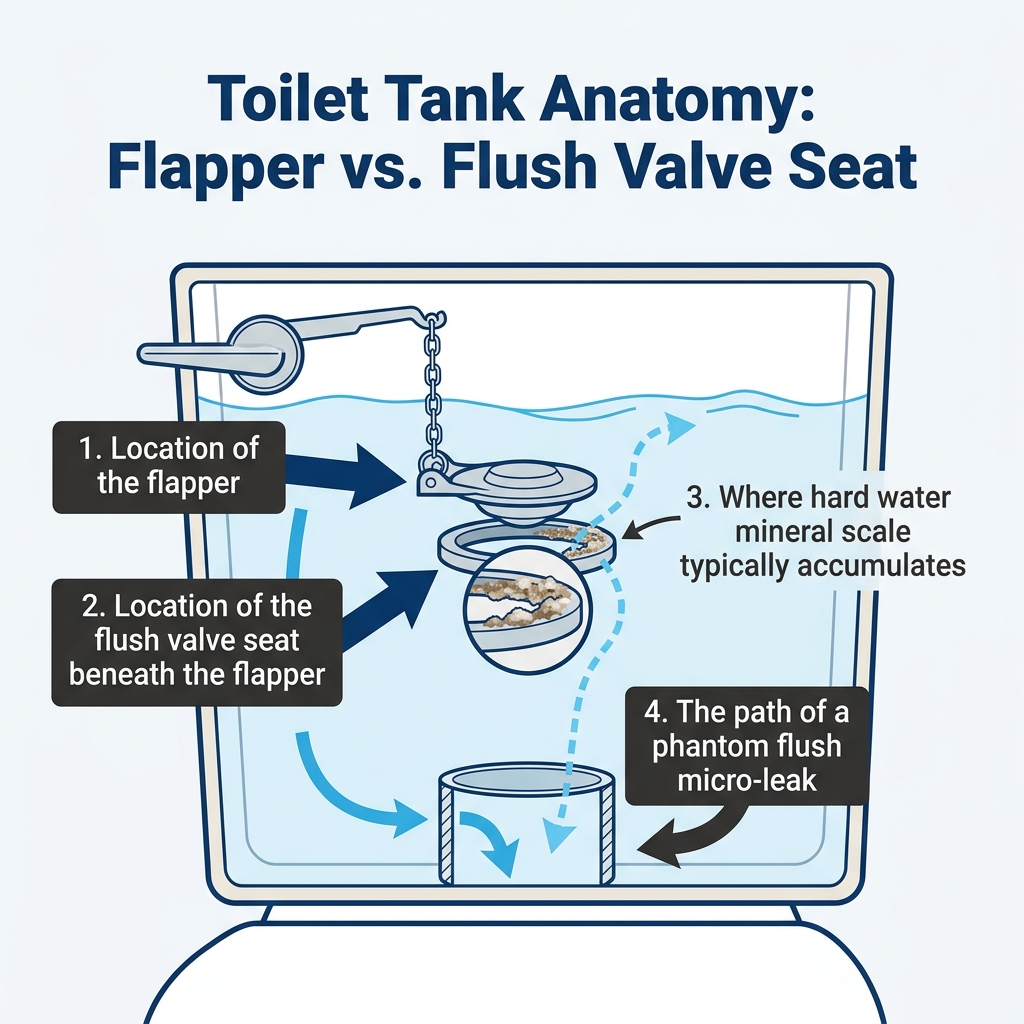
To understand why a new flapper often fails to solve a running toilet, you have to look deeper into the mechanics of the flush valve assembly. The flush valve is the large plastic or brass mechanism situated at the very bottom center of your toilet tank. Its primary job is to hold water in the tank until you press the handle, at which point it releases a high-volume rush of water into the bowl to initiate the flush.
The flapper itself is just a movable rubber lid. It rests directly on a stationary component called the flush valve seat. For a watertight seal to form, the flexible rubber of the flapper must press tightly against the hard, perfectly smooth rim of the flush valve seat. If that seat is pitted, scratched, or covered in debris, water will find a way through the microscopic gaps.
This mechanical reality explains why a brand-new flapper will still leak if the seat beneath it is compromised. You can swap out flappers all day long, but if the foundational gasket is damaged, the phantom flush will persist. Before you assume the entire fixture is broken and start looking into upgrading to a comfort height toilet, it is crucial to rule out simple seal failures. Plumbers do this by relying on a food coloring dye test in the tank to confirm a seat leak before recommending a total replacement.
The Role of the Flush Valve Seat
The flush valve seat is the unsung hero of your toilet's internal plumbing. It acts as the foundational gasket for the entire flush mechanism. To function properly, it must meet two strict criteria:
• Absolute circular perfection: The rim must be perfectly round with no warping or distortion from age.
• A pristine surface: The plastic or brass lip must be completely free of grit, mineral buildup, or chemical degradation.
When either of these criteria fails, the seat can no longer support the flapper, and the slow drain of a phantom flush begins.

The Hidden Culprit: Mineral Scale and Hard Water
While rubber and plastic plumbing seals naturally degrade over years of constant submersion, mineral buildup is a much faster and far more common cause of flush valve seat failure. Water is rarely just pure H2O; it carries dissolved minerals that interact with your plumbing fixtures every single day.
Central Illinois (including the Jacksonville area) often deals with hard water, which accelerates mineral scale buildup on flush valve seats—a primary hidden cause of phantom flushes in the region. Hard water contains high concentrations of dissolved calcium and magnesium. When this water sits idle in your toilet tank for hours at a time, these minerals precipitate out of the liquid and cling to the surfaces inside the tank.
Over time, this process forms a hard, jagged, crusty layer of scale directly on the rim of the flush valve seat. Because the scale is rough and uneven, it creates micro-gaps beneath the rubber flapper. Water slowly seeps through these microscopic channels, draining into the bowl drop by drop until the tank's water level drops low enough to trigger the fill valve.
Common signs of hard water damage in a toilet tank:
• Chalky white buildup: A crusty ring around the inside of the tank walls.
• Discolored flappers: Rubber that has turned white, brittle, or stiff to the touch.
• Rough surfaces: A flush valve seat that feels like sandpaper rather than smooth plastic.
The tricky part about mineral scale is that it is often completely invisible to the naked eye when submerged under tank water. The seat might look perfectly fine from above. This is exactly why professionals rely on a food coloring dye test in the tank to confirm a seat leak—it reveals the micro-leaks that the human eye cannot see through the water distortion.
How Professionals Use the Food Coloring Dye Test
When a homeowner complains of a phantom flush, a professional plumber does not immediately start ripping out parts. Instead, they use a highly specific diagnostic method to prove exactly where the water is escaping. The most reliable method is the food coloring dye test in the tank to confirm a seat leak.
This test provides concrete, undeniable evidence of a compromised flush valve seat, preventing you from guessing what to fix next. Here is an overview of how professionals conduct this diagnostic test:
1. Prepping the environment: The technician ensures the toilet has not been flushed recently and the water in the bowl is completely clear.
2. Applying the dye: Several drops of dark food coloring (usually dark blue or red) or a specialized plumbing dye tablet are dropped directly into the upper tank water.
3. The waiting period: The technician waits 15 to 20 minutes without touching the flush handle. This allows the heavy dye to settle toward the bottom of the tank near the flush valve seat.
4. Analyzing the bowl: After the waiting period, the technician inspects the water in the toilet bowl.
The interpretation of this test is straightforward. If the water in the bowl remains perfectly clear, the flush valve seat is holding strong, and the phantom flush is likely caused by an overactive fill valve or a water level set too high. However, if dye appears in the bowl—especially right after a brand-new flapper was installed—the flush valve seat is definitively failing. The dye has physically traced the path of the micro-leak through the mineral scale and down into the bowl.
Why the 'Parts Cannon' Approach Fails Homeowners
There is a common psychological trap in DIY home repair known as the "parts cannon" approach. When a fixture breaks, the instinct is to fire new parts at it until the problem stops. With a running toilet, this usually starts with replacing the flapper. When that fails, a homeowner might replace the fill valve. Next goes the handle chain, then the overflow tube.
This guessing game wastes your weekend, drains your wallet on unnecessary hardware store trips, and crucially, allows the leak to continue unabated while you figure things out. Every day spent guessing is another day of wasted water.
HRI Plumbing utilizes a professional, step-by-step diagnostic process that saves homeowners from endless, frustrating DIY parts swapping. Instead of guessing, a trained technician pinpoints the exact point of failure immediately. For instance, one local homeowner called for a rapid response because of an ongoing plumbing issue they couldn't figure out. A technician arrived in under thirty minutes and identified the exact problem in under five minutes, proving the value of professional insight over guesswork.
A professional will always run conclusive diagnostic checks—like the food coloring dye test in the tank to confirm a seat leak—before recommending any parts. This diagnostic mindset ensures you only pay for the exact repair you actually need.
The Risks of DIY Tank Removal for Seat Replacement
Once a diagnostic test confirms that the flush valve seat is degraded or scaled beyond repair, the entire flush valve assembly must be replaced. This is where the boundary between safe DIY maintenance and professional plumbing repair becomes very clear.
Replacing a flush valve seat is not like swapping a flapper. The seat is physically locked into the bottom of the toilet tank. To remove and replace it, you must completely drain the tank, disconnect the water supply line, unbolt the heavy porcelain tank from the toilet bowl, and lift it entirely off the fixture.
The risks associated with DIY tank removal are significant. Porcelain is incredibly heavy, slippery when wet, and shockingly fragile. A dropped tank will shatter instantly. Furthermore, the bolts holding the tank to the bowl are often heavily corroded. Attempting to force them can crack the porcelain base, turning a simple repair into a requirement for a completely new toilet. Finally, if the new assembly is not seated and torqued perfectly, you risk creating a massive floor leak the next time you turn the water back on.
In one instance, a homeowner dealing with a major leak underneath their home on a slab foundation needed extensive repairs. A technician walked them through their options and helped them make a decision, resulting in all new plumbing, an exhaust fan, and toilet fittings being installed safely and correctly. Relying on experienced Jacksonville plumbers ensures that structural toilet repairs are handled safely, protecting your bathroom floors from catastrophic water damage.
Why Tank-to-Bowl Gaskets Fail During DIY
The most common failure point during a DIY flush valve replacement is the tank-to-bowl gasket. This is the large sponge rubber ring that seals the connection between the upper tank and the lower bowl.
• Improper torque: Tightening the tank bolts too much cracks the porcelain; tightening them too little leaves a loose, wobbly tank that will eventually leak.
• Reusing old gaskets: The main sponge gasket compresses over time. Whenever the tank is lifted, this gasket must be replaced, as it will never regain its original shape to form a new seal.
• Alignment issues: Professional plumbers know exactly how to balance the tension on both sides of the tank to ensure the gasket seats evenly.
Because the food coloring dye test in the tank to confirm a seat leak proves that the entire assembly must come out, it is always best to let a professional handle the heavy lifting and torque calibration.
The Compounding Impact of Unresolved Phantom Flushes
A running toilet might seem like a minor annoyance, but it is actually one of the most expensive plumbing leaks you can have. Because the water drains directly into the bowl and down the sewer line, it never creates a puddle on the floor. It runs silently in the background, wasting thousands of gallons of water per month without you ever noticing a mess.
This waste has a severe impact on your utility costs. August late summer water bills compounding with phantom flush waste can create a shocking financial burden just as you are preparing for the fall season. Late-summer utility usage is typically already high due to lawn care and cooling needs; adding a continuous, 24/7 water leak exacerbates the waste exponentially.
Furthermore, if your water bill is spiking, you want to be absolutely certain the toilet is the only culprit. Professional plumbing leak detection can ensure no other hidden fixtures, underground pipes, or slab lines are contributing to the problem. Addressing a degraded flush valve seat immediately restores your home's water efficiency and stops the financial bleeding before the season changes.
Stop the Endless Cycle of Toilet Repairs
A brand-new flapper simply cannot fix a degraded or mineral-scaled flush valve seat. If you have already tried the standard DIY fix and your toilet is still running, it is time to stop throwing parts at the problem.
Professional diagnosis is the only way to stop August late summer water bills compounding with phantom flush waste. By utilizing definitive testing and safe, experienced repair techniques, a licensed plumber will restore your fixture to perfect working order.
Don't let a silent leak drain your wallet. Schedule professional toilet repair and installation today to permanently resolve that frustrating phantom flush.
Frequently Asked Questions
Why is my toilet still running after replacing the flapper?
If your toilet continues to run after a flapper replacement, the flush valve seat beneath it is likely compromised. The flapper requires a perfectly smooth surface to create a watertight seal. If the seat is covered in hard water mineral scale or has degraded over time, water will seep through the micro-gaps, triggering a continuous phantom flush.
How do you fix a phantom flush?
Fixing a phantom flush requires identifying exactly where the water is escaping from the tank. A professional will use a dye test to confirm if the flush valve seat is leaking. If the seat is damaged, the entire flush valve assembly must be replaced, which involves draining the tank, unbolting it from the bowl, and installing new hardware and gaskets.
Can a brand new toilet flapper leak?
Yes, a brand new toilet flapper will leak if it is installed over a damaged flush valve seat. The rubber flapper is only half of the sealing mechanism. If the seat has calcium buildup, pitting, or warping, even a factory-perfect flapper will not be able to stop water from slowly draining into the bowl.
How do you clean a flush valve seat?
Cleaning a flush valve seat involves turning off the water supply, draining the tank, and gently scrubbing the rim of the seat. Professionals often use specialized descaling solutions and non-abrasive pads to remove hard water buildup without scratching the plastic or brass. However, if the material is heavily degraded, cleaning won't work and the assembly must be replaced.
Does hard water ruin toilet flush valve seats?
Hard water is a primary cause of flush valve seat failure. The dissolved calcium and magnesium in hard water precipitate out and form a crusty scale on the plumbing components inside the tank. This scale creates a rough, jagged surface on the seat, making it impossible for the rubber flapper to form a tight, flat seal.
Why does flush valve seat replacement require removing the toilet tank?
The flush valve assembly is physically anchored through the large hole at the bottom of the toilet tank. To remove the old seat and install a new one, you must access the large locking nut located on the underside of the tank. This requires disconnecting the water line and lifting the heavy porcelain tank entirely off the toilet base.


